How to Manage & Setup your Voice Broadcast Campaign
February 19, 2019
Below is the overview of the Voice Broadcasting view.

Create Voice Broadcast Campaign
Learn how to Create a New Voice Broadcast Campaign here.
Edit A Campaign
Edit a campaign by clicking the pencil icon. There are 3 tabs explained below:
-
General tab

Campaign Name and Description: Name of your campaign and a brief description.Caller ID Name and Number: This is the CID information that will be used on the outbound calls generated by the system. This is what the client will see on their end. It is important to use real phone numbers. Using an invalid CID is not permitted by our service. Do not use 800 numbers.Never Call Before and Never Call After: Allows you to specify when the campaign should run. You need to configure your timezone correctly for this feature to work. This can be changed via Settings. Under General Properties, click the pencil icon beside Timezone. -
Options tab
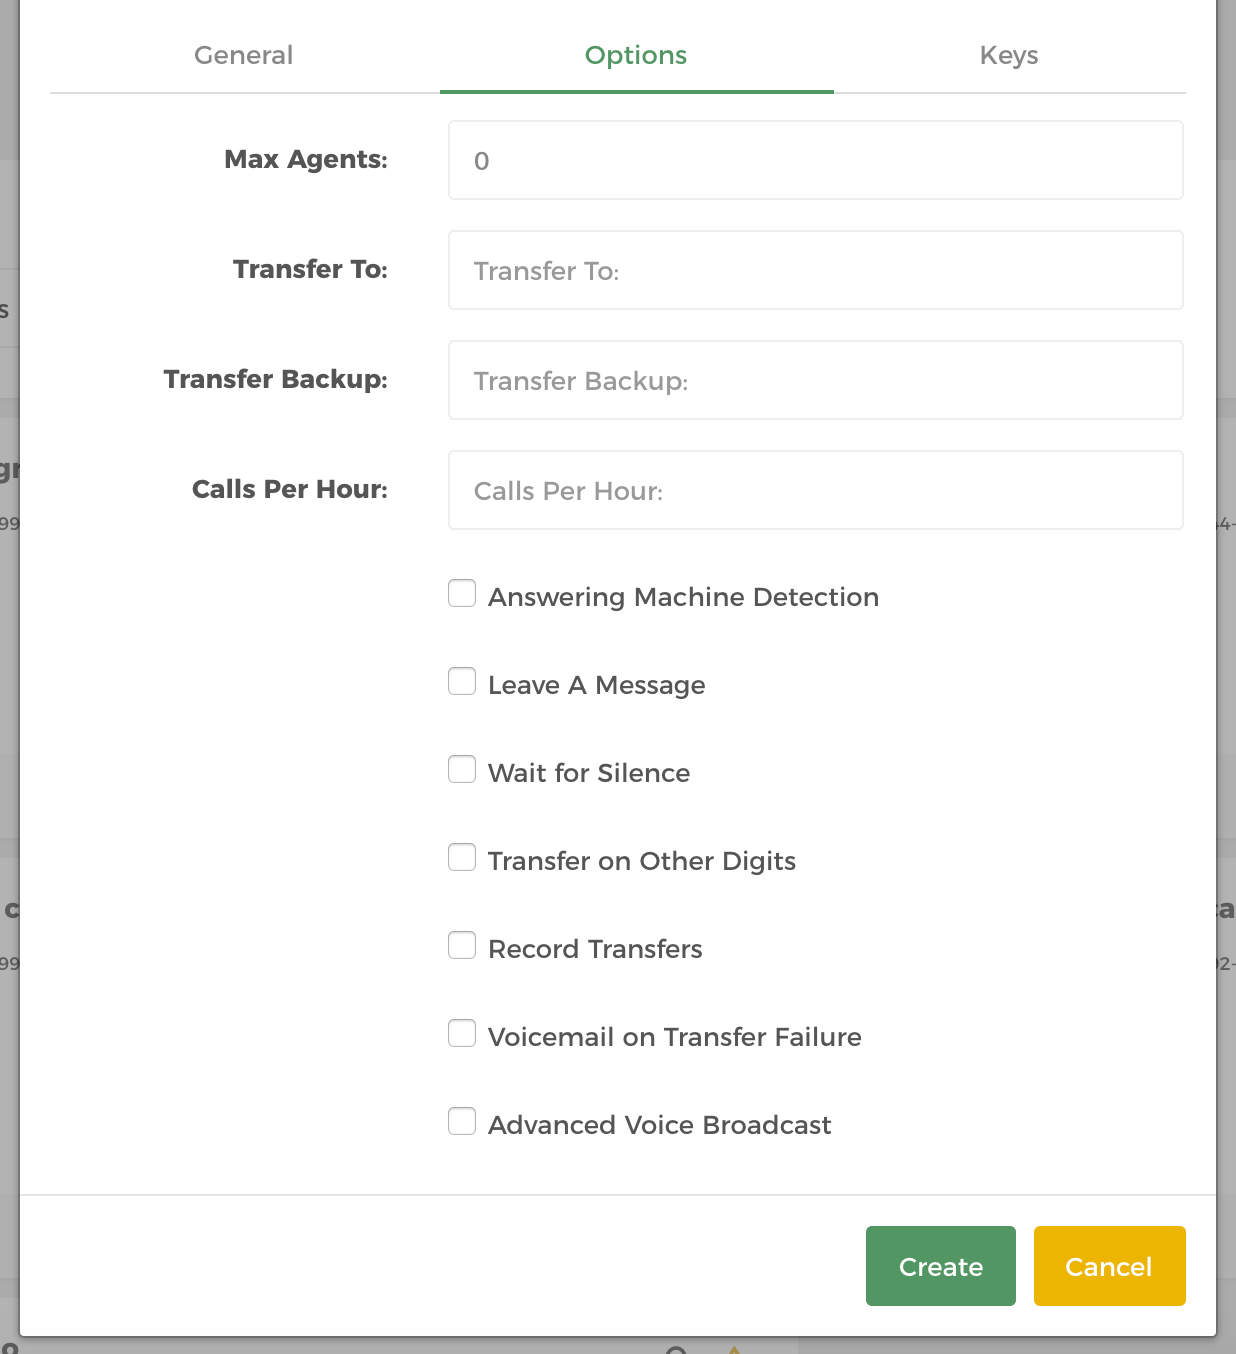
Max Agents: This is the total number of agents available to take calls that the dialer transfers.“Transfer To and Transfer Backup** : When running a voice broadcast you can give the recipient the option to be transferred to an agent.
Calls per Hour: This is the number of calls that you want to dial per hour.“Answering Machine Detection and Leave a Message** : Please select one of these options. AMD will drop the call upon detecting an answering machine. The detection takes around 2-3 seconds and due to the way the technology is implemented there may be some occasions where detection is not successful. Our system has one of the best detection rates in the Industry, however you should be aware that this is not going to be 100% accurate at all times. Leave a message setting is used to leave a preconfigured message when a voice mail is detected.
Wait For Silence: This adds some silence before playing your message. It is recommended that you test this feature first. This option instructs the dialer to not play a message unless someone on the other end speaks, otherwise your message will be played as soon as someone picks up.Transfer on Other Digits: When this box is checked, the dialer transfer the call if the contact presses any button at all.Record Transfers: Records calls that are transferred to the transfer number.Voicemail on Transfer Failure: Transferred calls are sent to voicemail if unanswered.Advanced voice broadcast: This option allows the voice broadcast to anything else that a customer might want. If they’re doing anything more complicated than just playing 1 audio file to a person with Transfer & DNC buttons, then we create a custom script. -
Keys tab
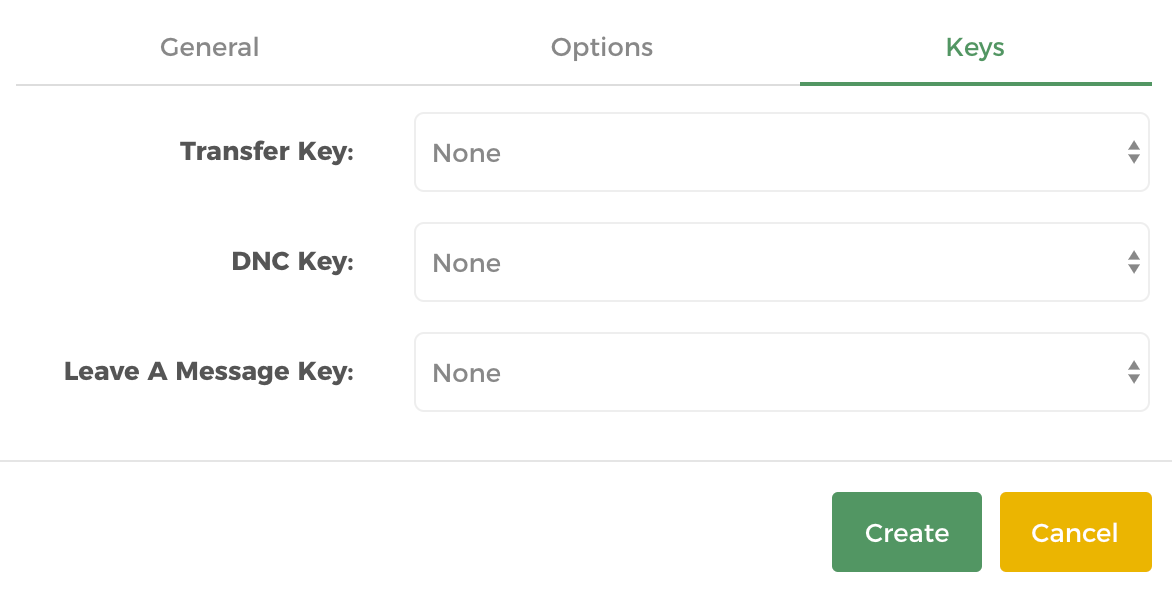
Transfer Key, DNC Key and Leave a Message key: These settings are used to map these features to specific key presses.
Increase / Decrease broadcast speed
Under a chosen VB campaign, there are arrow up and arrow down icons to increase calls per hour. The change of call rate will reflect automatically under the Calls per Hour statistics.
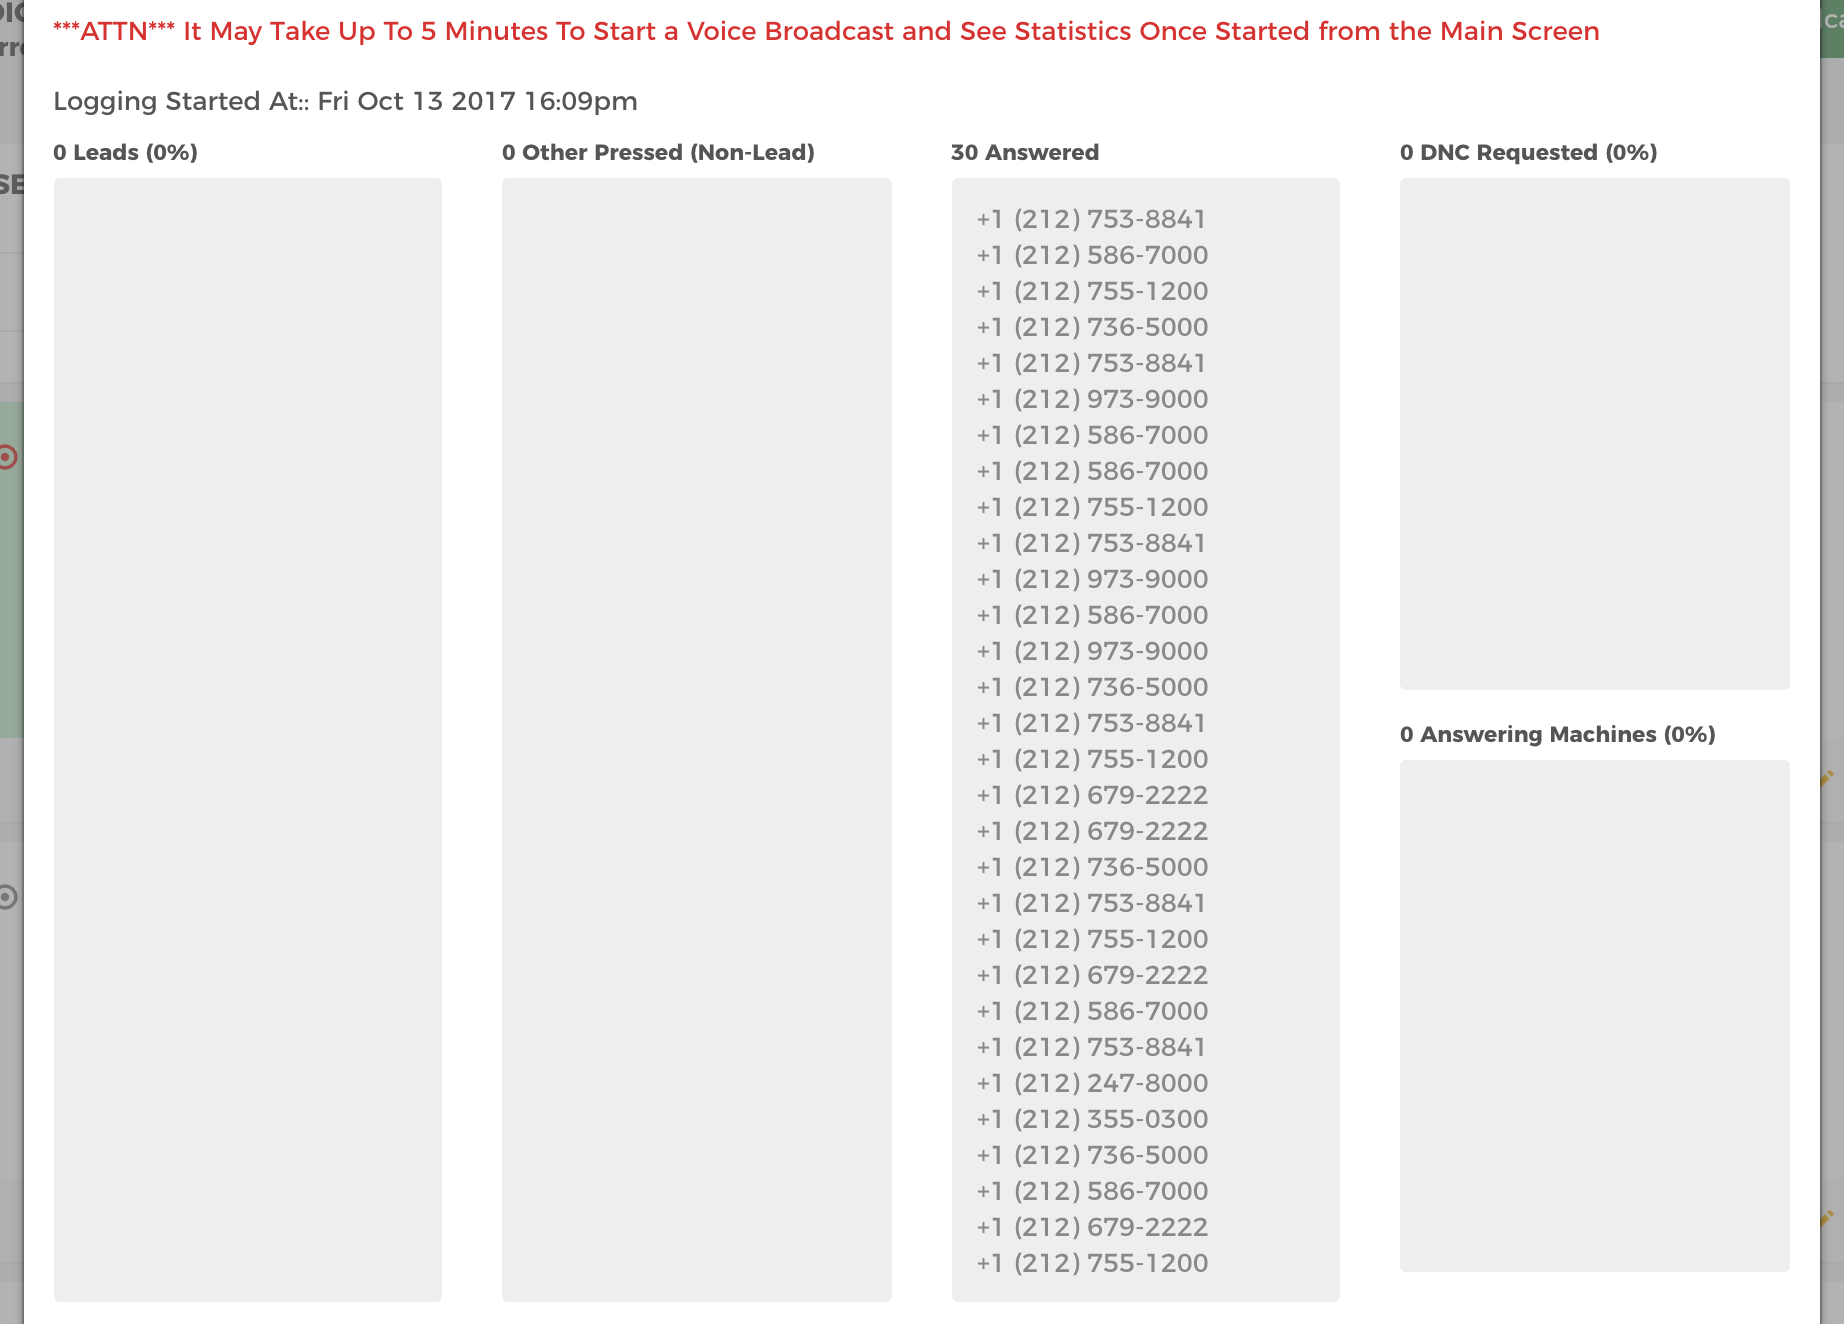
Real-time log
Real-time log graphs are already displayed under each Voice Broadcast campaign statistics. However, if you want a detailed view while a voice broadcast is running, click on the log (list) iconbeside the delete icon.
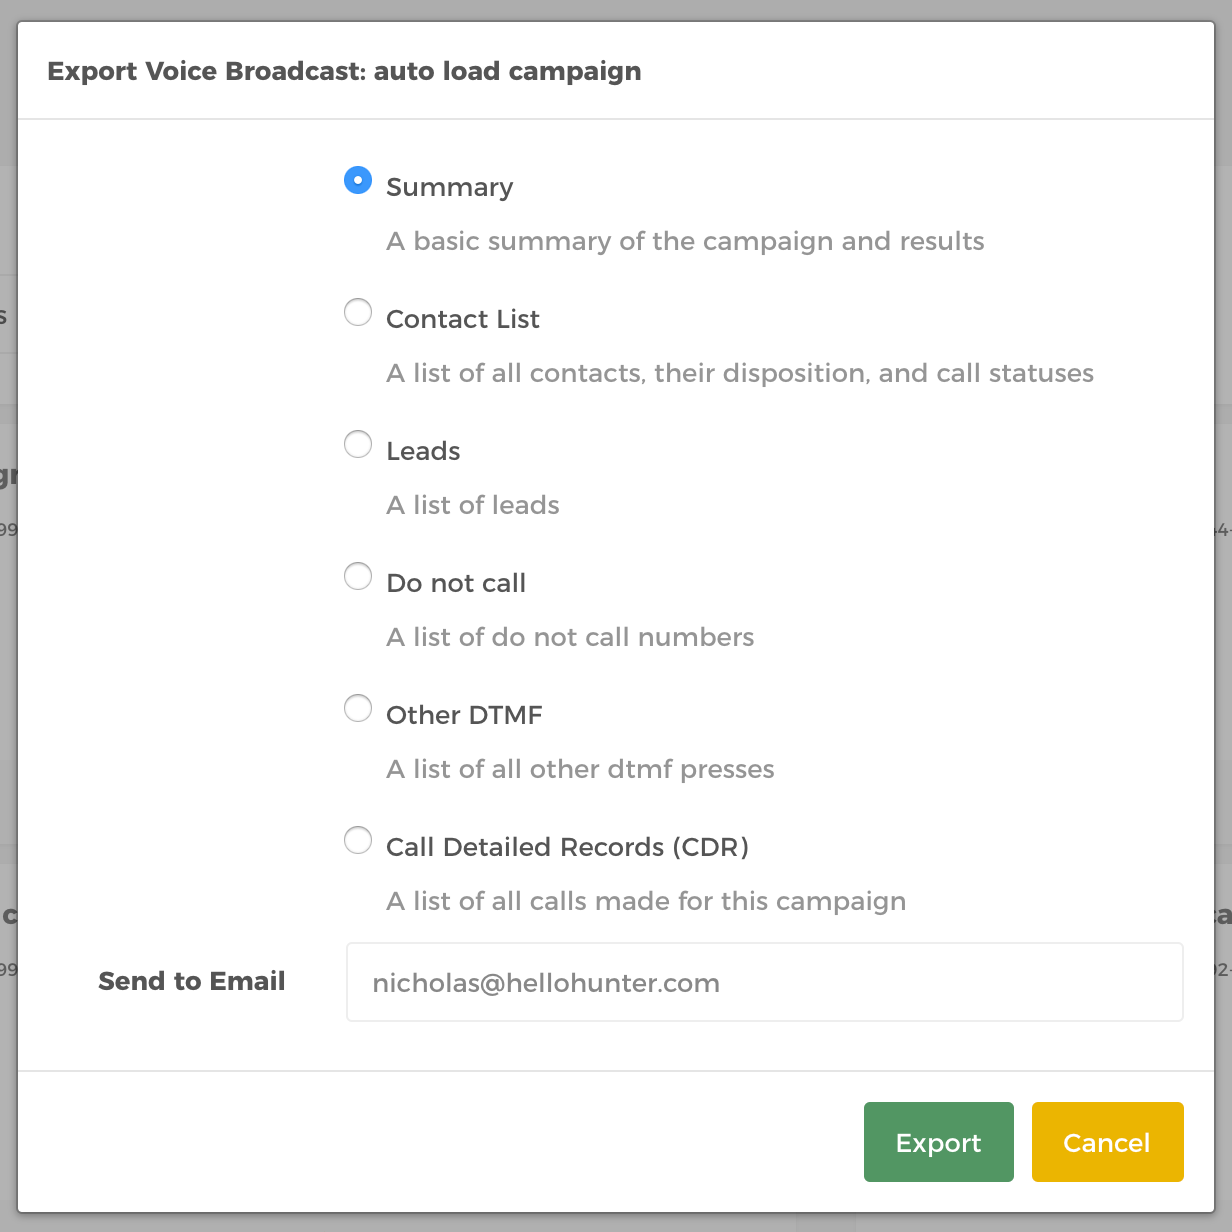
Export Campaign
Export to your email summary of the campaign and results, list of contacts with their dispositions and status, list of leads, list of do not call numbers, list of DTMF presses, or all calls made for the campaign to your email. Export by clicking the export icon that is symbolized as an upward arrow.
Add or Upload Broadcast Message
Learn how to Upload a Broadcast Message here.
Add or Upload Leads / Contacts
Learn how to Upload Contacts here.
Configure Settings

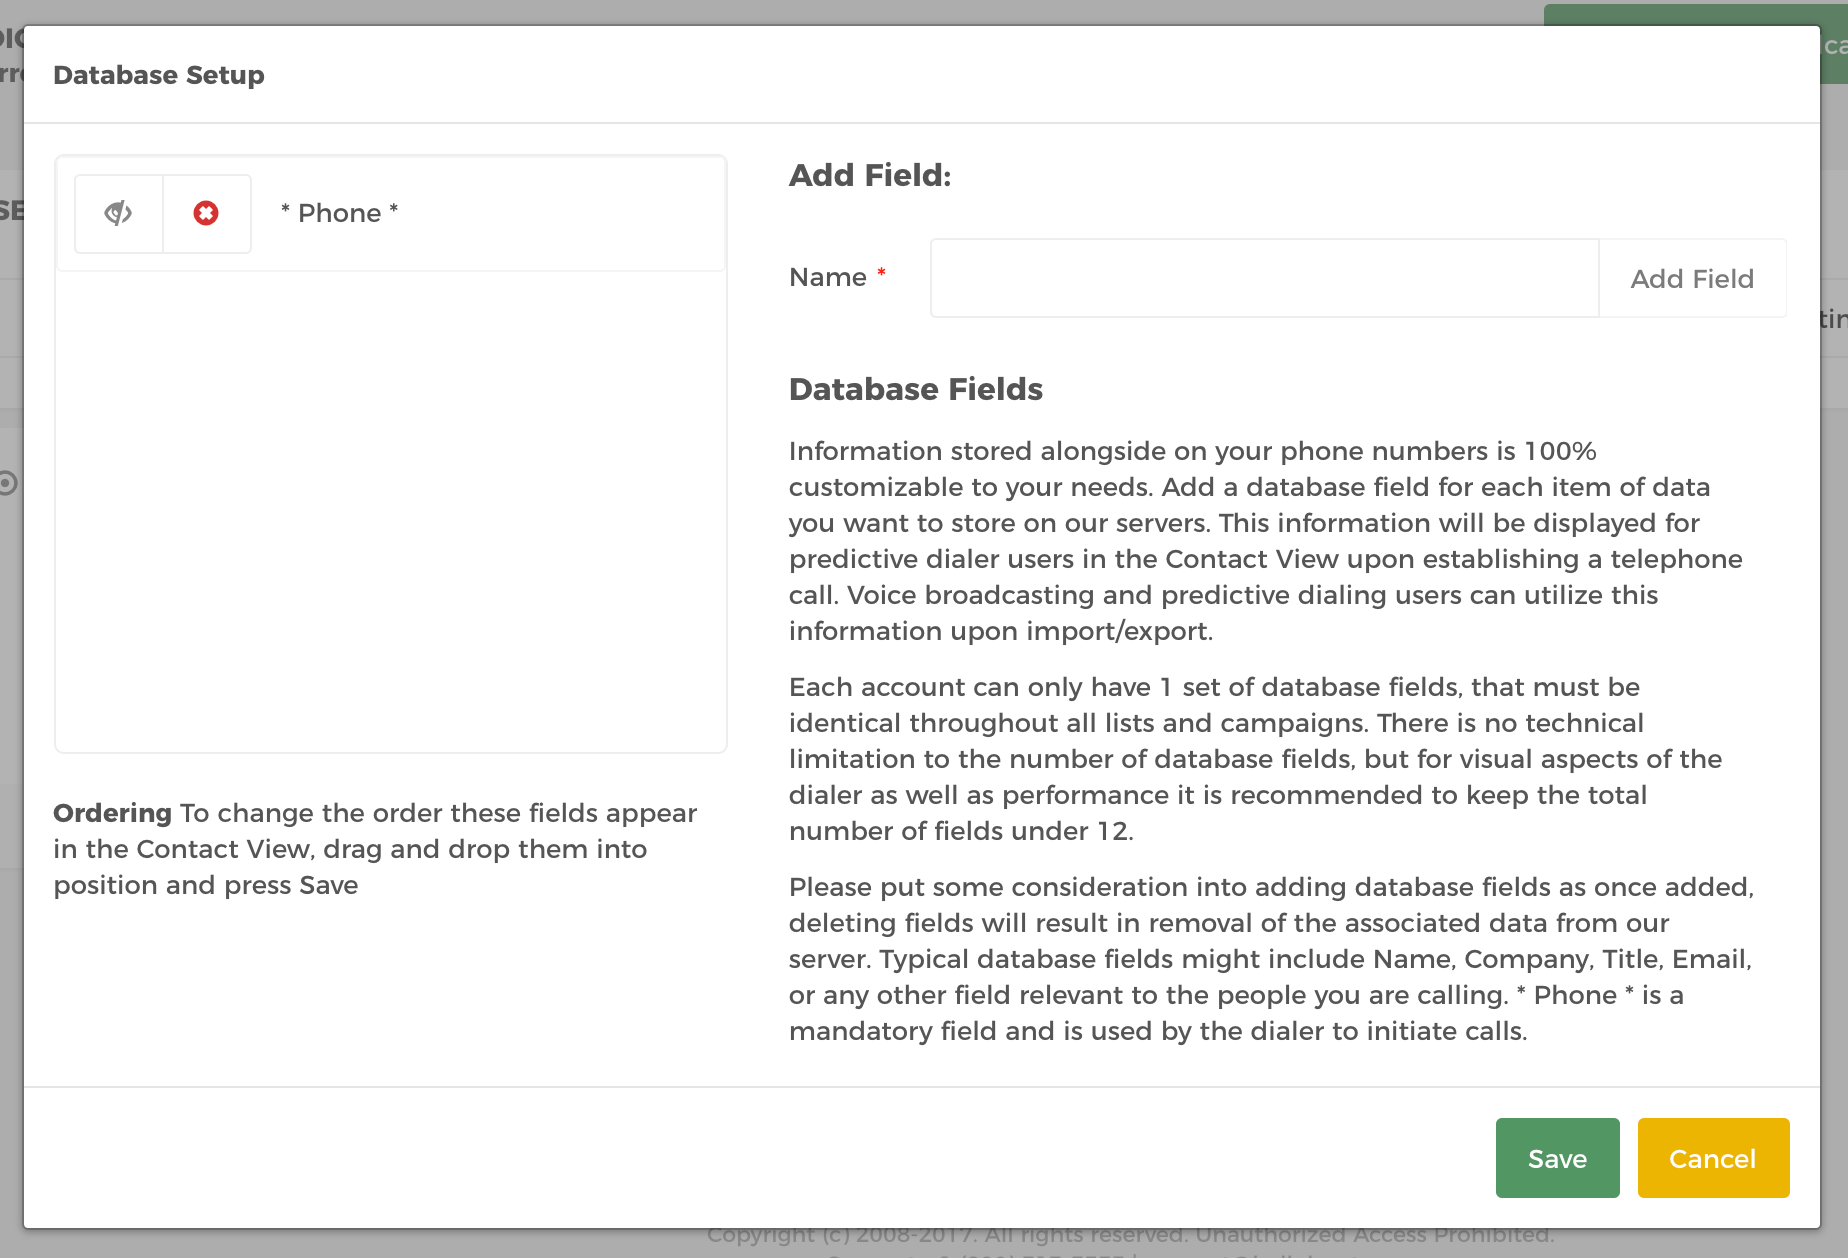
Setup Database Fields
Setup Database Fields add or removes fields that will be used in the systems database to store your contact list. By default there is only one field present on the system. This is the phone field that is used to store the your contacts telephone number. You should create additional database fields to store information about the contact such as name, address, company etc. The information will be displayed on the agent’s screen when they have a call connected to them. These fields are specified per account and cannot be changed from campaign to campaign.
Click the Setup Database Fields button. Below, you will see the interface for customising your database. Type a new name into the name box and click add field. Repeat this process until you have all the fields you require.
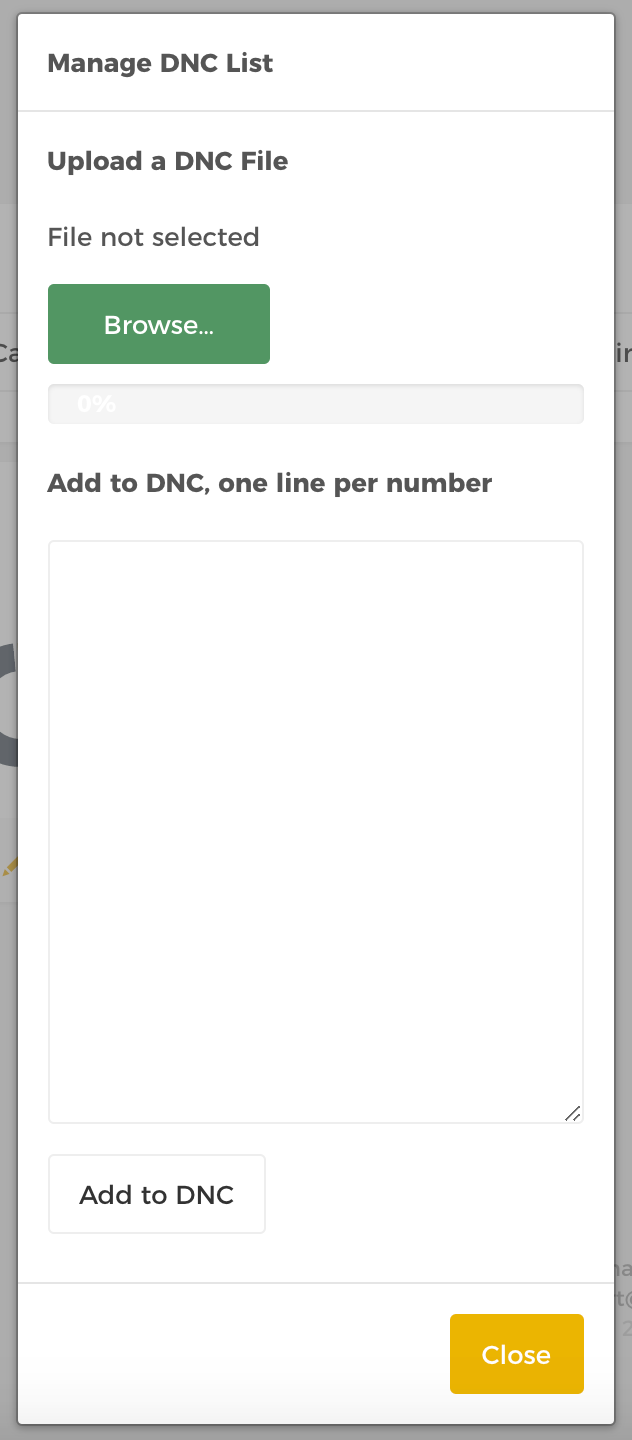
Manage Do Not Call List
Numbers can be added to the Do Not Call List through the Manage Do Not Call List button under the Setup panel in the main Voice Broadcasting screen. There are two ways that numbers can be added to our system, using a CSV file to upload a group of numbers or add numbers one by one.
Contacts need to be in a CSV format. Our systems do not support other types of contact files. We recommend using Excel to save the contact file as a CSV file.
Please ensure that you have the word “Phone” as name of the field that contains numbers. This is very important. Please do not use PHONE or any other variant. It is required to be Phone ( A capital P followed by lower case one) and specifying this differently will lead to upload errors.
To upload a group of numbers from a pre created CSV file click browse on the Manage Do Not call list Interface. Locate the your CSV file and then click upload. Click OK to the notification and then click Done to close the interface. You will receive an email with details of the import once complete. Please review this and should you have any issues please contact support@hellohunter.com.
To upload individual numbers to the DNC list add them into the text box in the Manage Do Not Call List interface, using one line for one number. Click Add to DNC. Click OK to acknowledge any notifications and click Done.
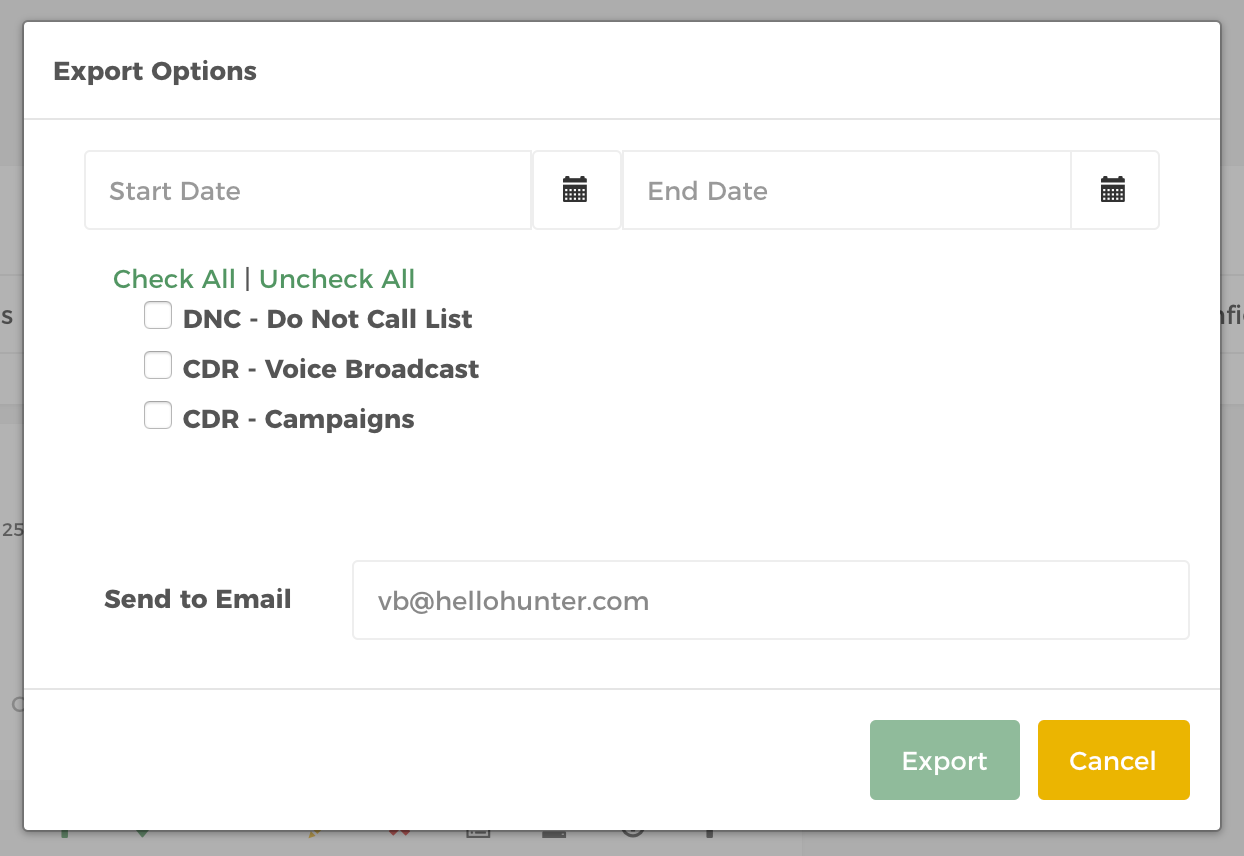
Export Account
You can export to your email Do Not Call lists, list of Call Detailed Records (CDR) of Voice Broadcast, and / or Call Detailed Records (CDR) of Campaigns within a specified Start and End date.
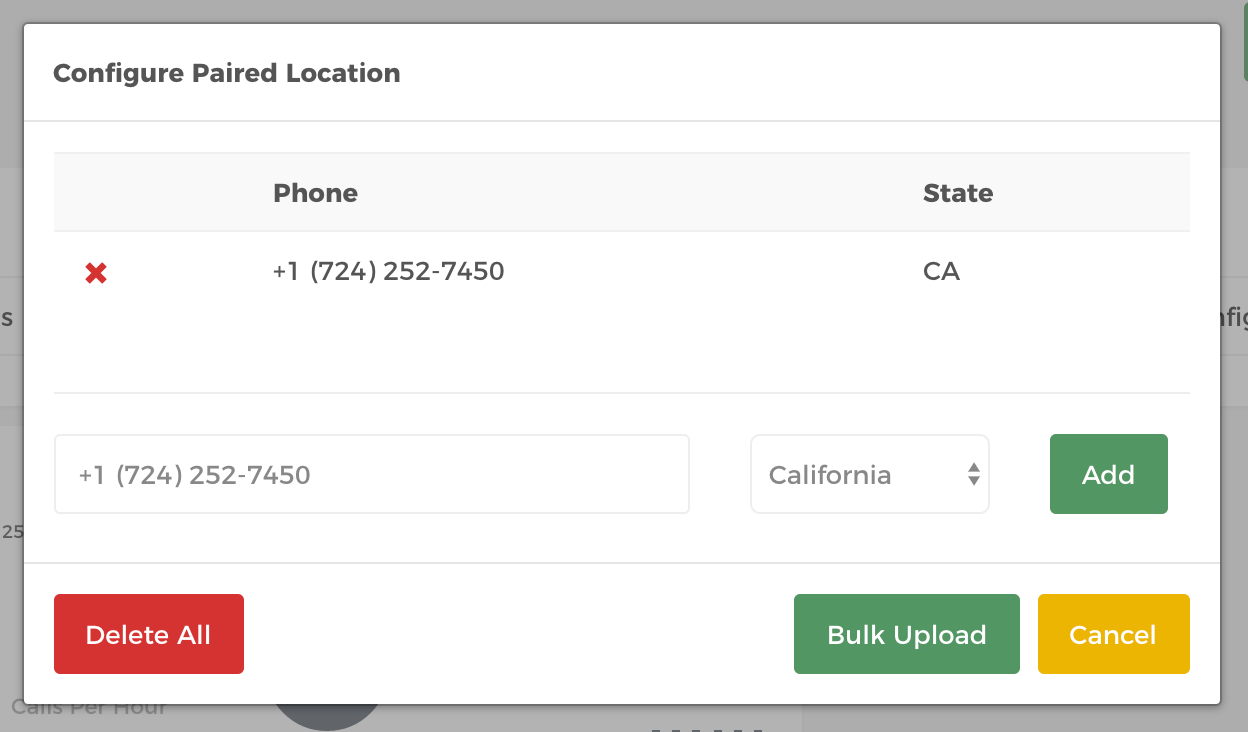
Configure Paired Locations
Allows you to define multiple caller IDs based on the destination country, city and/or state to provide a local presence. This is also known as GEO Caller IDs.
Configure Tasks
Lets you Start & Stop a campaign without human intervention within a specified day, start time & end time.

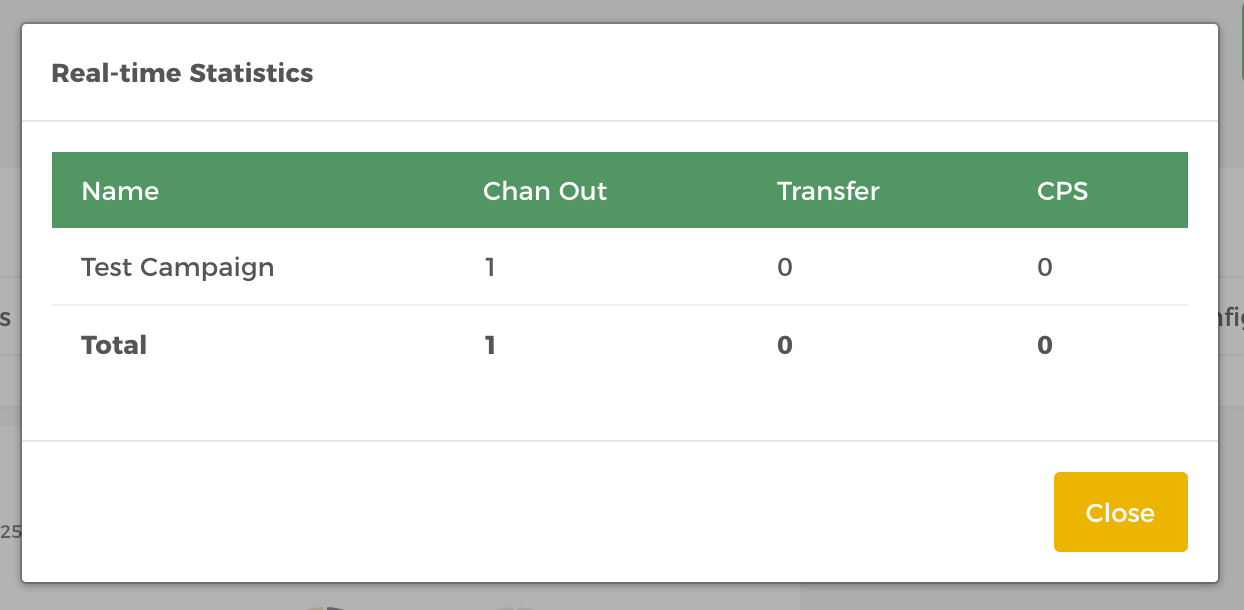
View Real-time Stats
Allow you to view the current performance of your running campaigns. See the number of phone call channels (Chan Out), number of Transfers, and number of Calls Per Second (CPS).